| BASIC IMAGE PROCESSING (Please
be patient while the images load)
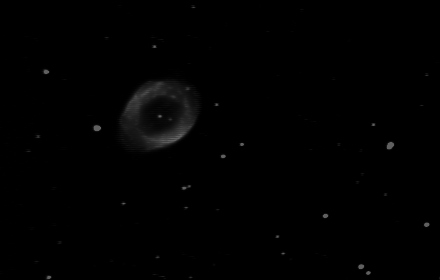
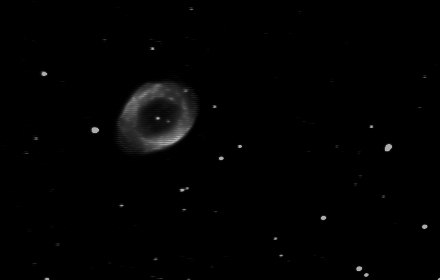
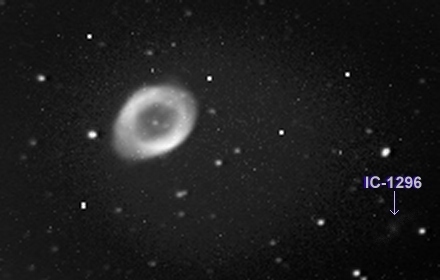
(Adjust brightness and contrast on your monitor for best viewing) This tutorial presents a basic overview of image processing techniques for Deep Space Objects. The tutorial is presented in a very rudimentary fashion to help develop an understanding of basic image processing, which is a combination of art and science. Dark and flat fields should be applied to all images, but what happens beyond that is largely up to the judgement of the person processing the image. When you get past Step 3 of the tutorial, there is no "one correct method" anymore....it's all up to you beyond that point. For this tutorial, I used Version 7 of Stellar Magic and Version 5 of Paint Shop Pro. Paint Shop Pro is a very powerful and inexpensive graphics program and I have linked to the company that sells it on my main page. Stellar Magic may still be available on the internet. One thing that I cannot emphasize enough is that once you complete Step 3 below, make sure you save your image and don't do any further operations on anything but a copy of it. Once you have created the "calibrated image", you don't want to mess with it. Always make a copy at this point and perform any further image processing on the copy. The reason for this is that beyond Step 3, you are in a part of the process that involves a lot of choices and possibilities. If you don't like the results you are getting, you may have to start over and you will need the calibrated image to do so. Image processing involves a series of mathematical techniques that can get you from here: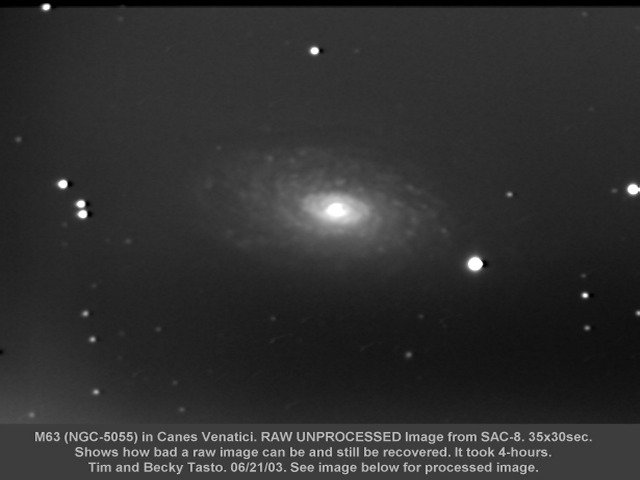 To here:  Let's get started! All CCD imagers generate noise. The SAC-8 has particularly low noise, but often hot pixels show up and require removal. This is the purpose of the dark frame. It will remove hot pixels and noise generated by the CCD chip. The image on the left is the raw "dirty" image containing the effects of CCD chip noise and optical vignetting. Some of those bright white dots are not stars - rather, they are "hot pixels" on the CCD chip. The first step is to remove the chip noise and hot pixels. Subtraction of the dark frame accomplishes this. The image on the far left is a raw frame of M57 out of the SAC-8. The center image is the dark frame. The dark frame subtraction process is illustrated below.  Note that the "hot pixels" are gone following the subtraction of the dark frame. The optical vignetting remains in the resulting image on the right, however. In Step 3, a flat field will be used to remove the vignetting. Step 2: Flat Field Preparation The flat field is used to remove optical effects such as vignetting. The flat field also contains chip noise and a dark frame must also be subtracted from it before it is applied to the image of M57. So, we subtract a dark frame from the raw flat field. The raw and noisy flat field is on the far left. The dark frame is in the center image. The result is shown on the far right.  Step 3: Flat Field Division The flat field is now ready for application to the image of M57. The flat field application shown below is a division operation because optical effects are accumulated in a multiplicative fashion on the CCD chip. Therefore, division is required to remove them (instead of subtraction). The process is illustrated below.  The 3 images above are slightly deceptive in that one step is not shown. When the division of the image by the flat field occurs, the image becomes "scaled" and loses some of it's brightness. I have ommitted the step where the brightness of the image is restored (because it is very simple to brighten it up again). The final image on the right has already been re-brightened and shows the effect of flat field application. Though the image still contains a slight gradient, I am not going to address gradient removal in this basic tutorial. We now have a calibrated image of M57. Chip noise, hot pixels and optical effects have been removed. What happens beyong this point is largely dependent upon the desires of the person processing the image. Some people may wish to stop at this point because the image contains the maximum amount of information. Processing steps beyond this point will result in a loss of information in the image. In the lower right hand corner of the calibrated image above, the small galaxy IC-1296 appears very faintly (you may or may not be able to see it by adjusting your monitor). The processing that follows will result in emphasizing M57, but IC-1296 will be lost. NOTE: Always save the final calibrated image and only process copies of it from this point on. There are many different ways to process an image depending upon the effect you wish to achieve. If you want to start over (or make a mistake), you will need the original calibrated image to do so. The processing that follows presents only one of MANY techniques that can be used. We are now entering the "creative" part of image processing (i.e. the fun part - because the possibilities are almost endless. I am only presenting one of many possible techniques). Step 4: Apply Van Crittert Deconvolution We now enter the part of image processing that is largely up to your own personal taste. This is the more "artistic" part. There are no hard and fast rules beyond this point. It's all up to your own preferences and what you think will produce an aesthetically pleasing image. I have chosen to bring out more detail in M57 by application of Van Crittert deconvolution. I used Stellar Magic to apply 4 iterations of Van Crittert deconvolution with a point spread function (PSF) of 3. I chose Van Crittert because it tends to be a "softer" deconvolution than Richardson-Lucy or Maximum Entropy.The result is shown below. Note that I am presenting a larger image now. It is the full size version of the image that resulted from Step 3 above.
On my monitor, I can still see a glimpse of IC-1296 in the lower right corner. Some detail in M57 is also starting to emerge. The deconvolution has caused the image to become dim. Step 5: Power Law Stretch In this step, I make a crucial aesthetic decision as to what I want people to see when they look at the final image. Specifically, I want them to focus on M57 and I don't want them distracted by an uneven background. I am going to pay a price for this, however, in that this decision will cause IC-1296 and other data to be lost. If this image were for scientific purposes, I would not take this step, but because I want M57 to look it's best, the sacrifice will be made. I now use Stellar
Magic to apply a Power Law Stretch to the image. High Clip is set at 88,
Low Clip set at 9, and an exponent of 1.8 was used to bend the curve "down"
significantly. The clip values will compress the dynamic range of the image
somewhat too - yet another sacrifice.
We now have a nice clean background, but IC-1296 and other subtle background detail have been lost. That was the trade-off I made by choosing aesthetics over data retention. At this point, I want to work with the image in Paint Shop Pro. From Stellar Magic, I save the file as a BMP so it can be imported to Paint Shop Pro. (TIFF format would be better, but the current version of Stellar Magic does not provide that option.) Note that all processing to this point has been accomplished using FIT image format. By saving the image as a BMP, the bit-depth of the image is going to be sacrificed too since the FIT image is 16-bit (and I believe the BMP is only 8-bit). Step 6: More Histogram Adjustment Paint Shop Pro has a histogram adjustment in it, but it is called "Highlight/Midtone/Shadow" (in version 5). I now "play" with the histogram in Paint Shop Pro until I get the image brightened-up again. (Paint Shop Pro is now on Version 8 but I have not upgraded yet. I think the histogram functions in Version 8 are more flexible than in Version 5, so an upgrade may be in order.)
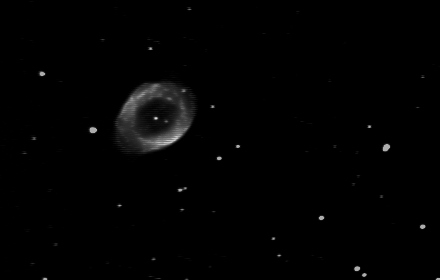
The image is now brighter as I hoped. Some subtle horizontal banding (characteristic of the SAC-8 in 640x480) is beginning to show. This banding will be dealt with in a later step. Step 7: Unsharp Mask Paint Shop Pro is used to apply a fairly mild Unsharp Mask and tweak out more detail in M57. Radius 5 and strength of only 30% were used.
A lot more detail has emerged in M57 itself, and it now stands out nicely from the background. The typical banding from the SAC-8 in hi-res mode is showing up quite a bit now. It will be removed in the next step. Also, note that if
you could see IC-1296 before, its gone for good now. Always work
on copies of the calibrated image that you saved earlier (Step 3) so that
if you don't like how things are turning out, you can start over.
Step 8: SAC-8 Banding Removal When using the SAC-8 in Hi-resolution mode, horizontal bands appear in the image. The Astrovideo software can be used to remove some of the banding by invoking the "Match odd/even Lines" option, but some banding still remains in the image. The application of a simple filter in Paint Shop Pro "User Defined Filters" can remove the remaining banding. The simple filter matrix works quite well but comes at the expense of very slight "damage" to the image. The trade-off seems reasonable though. The Filter Matrix that I use in Paint Shop Pro is simply: 0 0 0 (with a divisor of 2) That's it. Banding removed (without too much visible damage)!  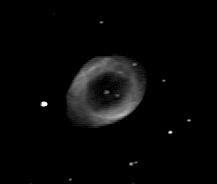 Before Matrix After Matrix
You can try the matrix for yourself by downloading the "Before" image with the banding. Then create the matrix in your software of choice (assuming your paint or image processing software allows you to create user defined filters) and apply the matrix. The banding should disappear as above.  Banding Removed! Step 9: Final Tweaking Finally, I tweak brightness and contrast to bring the image to the point that I think it looks best (I want the wispy bands that pass through the center of M57 to show up).  I am now happy with this result, so I save as both BMP (to preserve the image as-is) and JPG (for my web page). Note that JPG compression algorithms will damage the image. That's why I also save the BMP. The JPG image is necessary to keep the image file small for web page use. Step 10: A Comparison Let's compare what we started with and what we ended up with. The focus of this processing is to emphasize M57 itself, but at the cost of other detail in the background of the image. It's all a matter of trade-offs and choices. Is there a better way to process the image? Probably, and since we saved the original calibrated image from Step 3, we can save the result of this set of processing steps and then start over again and try something else. Steps 1 through 3 are essential.
Raw Image Before Processing Final Image After Processing This tutorial only presents a small snapshot of image processing techniques and contains a minimal number of steps. Many more/different things could have been done to the image (i.e. removal of the gradient using more "elegant" techniques than a brute force power law stretch that destroyed background detail, or processing to prevent the stars from turning harsh white, or even preserving IC-1296 while still emphasizing M57). The process up to and including Step 3 is usually imperative. After that, it's really up to you! Hope this helps! Return to Deep Space Imaging and Astrophotography Main Page All images copyright (c) Tim Tasto and Becky Tasto Image Processing
|